Organizing your WordPress website with a dedicated blog page can significantly enhance its structure, functionality, and user experience. Rather than displaying your blog posts on the homepage, setting up a separate page allows you to focus your homepage on core elements such as services, products, or portfolios. This setup is particularly useful for businesses, creatives, or anyone whose website is not primarily focused on blogging.
In this guide, we’ll explore why having a separate blog page is beneficial and provide a step-by-step tutorial on how to create one in WordPress. Whether you want a straightforward blog page or a fully customized design using a page builder, this guide has you covered.
Why Should You Consider a Separate Blog Page?

Creating a separate blog page in WordPress is more than just an aesthetic choice; it’s a strategic decision that can enhance your website’s functionality, user experience, and search engine optimization (SEO). Whether you’re running a personal blog, an online business, or a portfolio site, having a dedicated section for your blog posts offers numerous benefits.
1. Improved Organization
A separate blog page is an excellent way to declutter your homepage and keep your website organized. By isolating your blog content from other essential sections, you ensure that your homepage remains focused on showcasing your core information, such as products, services, or an introduction to your brand. This clarity allows your homepage to effectively communicate your primary message without distractions.
At the same time, having a dedicated blog page provides visitors with a centralized location to access your posts easily. This streamlined structure reduces the chances of confusion or overwhelm, making it simpler for users to navigate your site. This level of organization not only enhances the user experience but also creates a seamless flow throughout your website, helping it appear polished and professional.
2. Enhanced User Experience
Grouping your blog posts on a dedicated page improves usability by making it easy for visitors to find and browse your content. This clear separation of purposes between pages enhances navigation, ensuring that your audience knows exactly where to go for specific information.
For example, your homepage can focus on directing users toward key actions, such as signing up for a service, contacting you, or exploring your product or service offerings. Meanwhile, the blog page can act as a resource hub, providing readers with access to your latest insights, tutorials, or updates.
This well-defined structure not only makes your website more user-friendly but also encourages visitors to engage further by exploring different sections of your site. The improved clarity and organization can lead to increased time spent on your site, fostering stronger connections with your audience.
3. Increased SEO Potential
Search engines tend to favour websites with well-structured and logically separated content, making a dedicated blog page a smart choice for improving your site’s SEO. By isolating your blog posts on a specific page, you can strategically optimize this section with targeted keywords that resonate with your niche or your audience’s interests. This targeted approach helps your blog rank higher for specific queries, driving more relevant traffic to your site.
Additionally, a dedicated blog page allows you to implement metadata and structured URLs tailored to individual blog posts. This makes it easier for search engines to index your content effectively, increasing its visibility in search results. Meanwhile, your homepage can focus on broader brand-related keywords, building authority around your core offerings while allowing the blog page to address specific topics or queries.
This strategy creates an SEO-optimized website with multiple entry points for users. Whether visitors are searching for your brand or niche-specific content, your site is better positioned to capture their attention and meet their needs.
4. Easier Content Management
A separate blog page makes managing your site’s content more straightforward and efficient. By keeping blog posts on a dedicated page, you can organize them in a way that suits your needs, such as displaying them chronologically or categorizing them by topic. This structure simplifies updates and ensures your content remains easy to maintain.
Having a separate blog page also gives you the freedom to design its layout independently of your homepage. You can choose a format that best highlights your posts, such as a grid or list view, providing a more tailored experience for your readers.
Additionally, this separation proves valuable when you need to redesign or update your blog. Changes made to the blog page won’t impact the rest of your site, allowing for greater flexibility and preserving the consistency of your other pages. This approach ensures that your website remains functional and visually cohesive, even as you make adjustments.
How to Create Separate Pages for Blog Posts in WordPress
Separating your blog posts from your homepage gives your website a cleaner and more professional look, enhancing the user experience and content organization. WordPress makes this process simple with its built-in options—no plugins required! Below is a step-by-step guide to creating a dedicated blog page in WordPress.
Step 1: Create a New Homepage and Blog Page
To begin creating a separate blog page in WordPress, start by setting up two essential pages: one for your homepage and another for your blog. First, log in to your WordPress Dashboard by entering your credentials to access the admin panel.
Next, navigate to the Pages section in the left-hand menu and click Add New to create your pages. Title the first page “Home” or “Homepage,” as this will serve as the primary landing page for your visitors. Then, create a second page titled “Blog” (or use alternatives like “News” or “Articles” depending on your site’s theme and tone).
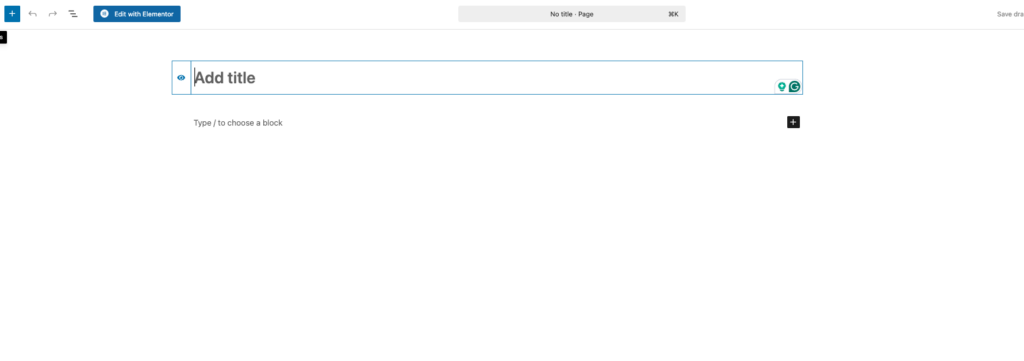
At this stage, you don’t need to add any content to these pages; simply leave them blank. Once the pages are ready, click the Publish button for both pages to make them live on your site. These pages are now prepared to be set up as your homepage and dedicated blog page.
Step 2: Set Up a Static Homepage and Assign the Blog Page
Once you’ve created your pages, the next step is to configure your site to use a static homepage and designate the blog page for your posts.
Start by navigating to Settings > Reading in your WordPress dashboard. In the “Your homepage displays” section, select the option for A static page instead of the default setting that shows your latest posts.
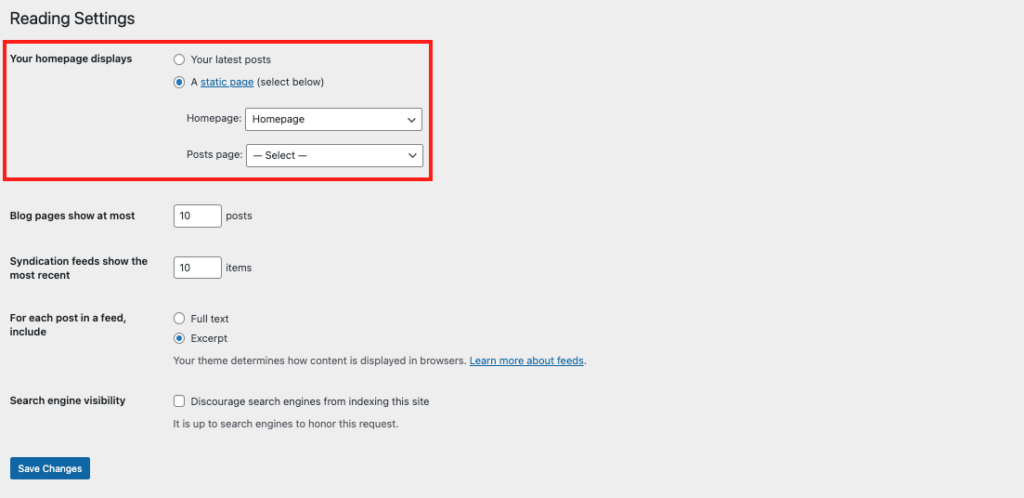
Next, assign the pages you created. For the Homepage, choose the “Home” page, and for the Posts page, select the “Blog” page.
Finally, scroll to the bottom of the page and click Save Changes to apply these settings. Your site will now display the homepage you created as the landing page, and your blog posts will appear on the dedicated blog page.
Step 3: Verify Your Setup
To ensure everything is set up correctly, double-check the page assignments in your WordPress dashboard.
Start by going to Pages > All Pages. Here, you’ll see a list of all the pages on your site. Verify that the Home page is labelled as the Front Page and the Blog page is labelled as the Posts Page. This confirms that your homepage and blog page are properly assigned.
Next, preview your blog page by clicking the View link under the Blog page. This will allow you to confirm that the page is displaying your latest posts as intended. If everything looks good, your site is now set up with a separate blog page!
Step 4: Customize Your Homepage
Now that your homepage is set up, it’s time to customize it to reflect your brand’s identity.
Start by navigating to Pages > All Pages in your WordPress dashboard and click on the “Home” page to begin editing.
Use the WordPress Block Editor to add and arrange various elements on your homepage. You can incorporate text, images, buttons, galleries, and other types of content to create a visually appealing layout. To better organize your content, utilize columns and sections. For example, you might include:
- A welcome message that introduces visitors to your brand.
- Highlighted key products or services that you want to showcase.
- Contact details or call-to-action buttons to encourage visitors to engage with your business.
Once you’ve finalized the design and content, click Update or Publish to save your changes and make the homepage live on your site.
Step 5: Customize Your Blog Page
While WordPress automatically populates the Blog page with your latest posts, you can further customize it to better match your site’s theme and style.
Start by navigating to Appearance > Editor if you’re using a block-based theme. Once in the editor, click on Pages and select the Blog page to begin customizing.
From here, you can modify the layout using blocks. For example, you can:
- Add a sidebar to display useful elements like categories, tags, or recent posts.
- Use filters to display posts from specific categories or tags, making it easier for readers to navigate content that interests them.
- Adjust the colors, fonts, and backgrounds to align the blog page with the overall design of your website.
Once you’ve made the desired changes, click Save to store your settings and apply the updates to your blog page.
Selecting the Best Themes and Templates for Your Blog Page
Choosing the right theme for your WordPress blog page is a crucial step in building a visually appealing, functional, and user-friendly website. A well-designed theme does more than just enhance the look of your site—it supports performance, ensures compatibility with modern devices, and creates a seamless browsing experience.
Why Theme Selection Is Crucial for Your Blog Page
Your WordPress theme serves as the foundation of your website’s design and usability. For a blog page, the right theme should:
- Attract Attention: Feature a clean, reader-friendly design that encourages visitors to explore your content.
- Enhance Navigation: Provide intuitive layouts and widgets for easy access to categories, recent posts, and archives.
- Offer Flexibility: Allow customization of headers, footers, and widgets to align with your brand identity.
- Boost SEO: Include well-coded features that support fast load times and optimized performance.
By selecting the right theme, you can ensure your blog page looks professional, performs well, and meets the needs of your audience.
Key Features to Look For in a WordPress Blog Theme
When choosing a theme for your blog page, prioritize the following features:
1. SEO-Friendly Design
Themes with clean, optimized code improve your site’s search engine rankings. Look for themes that offer:
- Structured data markup for better indexing.
- Built-in schema support.
- Fast-loading designs to improve page performance.
2. Responsiveness
A responsive theme adapts seamlessly to different devices and screen sizes, ensuring your blog looks great on desktops, tablets, and smartphones. This is especially important as a majority of web traffic now comes from mobile devices.
3. Fast Loading Times
Website speed significantly impacts both user experience and SEO. Lightweight themes with optimized code can:
- Improve load times.
- Reduce bounce rates.
- Keep visitors engaged with your content.
4. Customization Options
Themes with built-in customization options or compatibility with drag-and-drop page builders like Elementor allow you to:
- Personalize colors, fonts, and layouts.
- Add widgets for recent posts, categories, or social media links.
- Design a unique look without touching code.
Top WordPress Themes for Blog Pages
Here are some of the best WordPress themes designed for creating beautiful and functional blog pages:
Astra

Astra is a lightweight and highly customizable WordPress theme that’s perfect for bloggers who prioritize speed and simplicity without compromising on design flexibility. Its lightweight framework ensures fast loading times, which not only improves user experience but also positively impacts search engine rankings. Astra comes with built-in SEO optimization, giving bloggers an edge when it comes to visibility.
One of Astra’s standout features is its library of pre-built templates, which cater to various blogging styles and niches. These templates allow users to quickly set up their blog page without needing advanced technical skills. Moreover, Astra integrates seamlessly with popular page builders like Elementor and Beaver Builder, offering additional flexibility for customizing layouts and designs. Whether you’re starting a personal blog or running a professional website, Astra’s combination of speed, simplicity, and customizability makes it an excellent choice.
GeneratePress
GeneratePress is another top-tier WordPress theme known for its minimalist design and performance-focused features. Its lightweight framework ensures fast loading speeds, making it a favourite among bloggers who prioritize user experience and site efficiency. GeneratePress is also highly responsive, meaning it automatically adjusts to provide an optimal viewing experience on devices of all sizes, from desktops to smartphones.
This theme is particularly ideal for niche bloggers and those managing content-heavy websites. GeneratePress’s clean code and streamlined design help maintain excellent site performance even as your blog grows. With its focus on simplicity and performance, GeneratePress allows bloggers to concentrate on content creation while still offering a professional and polished presentation.
OceanWP
OceanWP is a versatile and highly responsive WordPress theme designed to meet the needs of bloggers seeking advanced customization options. It’s eCommerce-ready, making it a great choice for bloggers who want to integrate online shops alongside their content. OceanWP’s versatility is further enhanced by its extensive library of demo templates, which allows users to find a design that aligns perfectly with their brand and blogging goals.
This theme stands out for its customization capabilities, offering tools to modify headers, footers, widgets, and layouts. It also supports a wide range of plugins, ensuring compatibility with features that extend the functionality of your blog. Whether you’re a casual blogger or a professional content creator, OceanWP provides the flexibility and tools needed to create a visually stunning and fully functional blog page.
Final Thoughts: How to Create a Separate Blog Post Page in WordPress
Creating a separate blog page in WordPress enhances your site’s layout. It makes the site more user-friendly, visually appealing, and organized. By dedicating a section to your blog posts, visitors can easily find and explore your content. Meanwhile, your homepage stays focused on showcasing your core message, products, or services, giving your site a polished look.
With a hosting provider like Bluehost, setting up a blog page is easy. Bluehost offers reliable hosting and intuitive tools, simplifying the technical setup so you can focus on creating great content. A clear layout improves the user experience and makes your website more engaging, encouraging visitors to explore further.
Separating content gives your site structure and helps readers navigate easily. This boosts your brand’s professionalism. Whether you’re a blogger, business owner, or content creator, a dedicated blog page is key to building a site that captivates and informs your audience.
