A well-designed sales funnel has been changing lives and helping grow online businesses. And WordPress working with a sales funnel will further boost your business.
It’s used to convert visitors into leads, leads into paying customers and paying customers into repeat customers.
If you are having a WordPress website, chances are it is not optimized for the best conversion. And that’s why you should create a sales funnel with your website to get a bigger result.
Today, we are going to share how to build a sales funnel in WordPress.
What Software Should You Use To Create a Sales Funnel in WordPress?
To start, we don’t recommend to start building it from scratch or coding it. Instead, we are going to recommend one of the best sales funnel builders out there, ClickFunnels.
One of the best sales funnels building apps out there, built by marketers for marketers.
As for the WordPress site, there is a plugin designed to integrate CLickFunnels with the CMS(content management system) platform easily.
By the way, to get started fast, you can try ClickFunnels for free for 14 days with zero risk.
Start Free ClickFunnels Trial Now
Which Sales Funnel Model Should You Use for Your WordPress Sales Funnel?
A standard sales funnel consists of three stages in its core structure:
- Top of the funnel: Target audience.
- Middle of the funnel: Potential customers.
- Bottom of the funnel: New customers.
Here’s what it looks like:
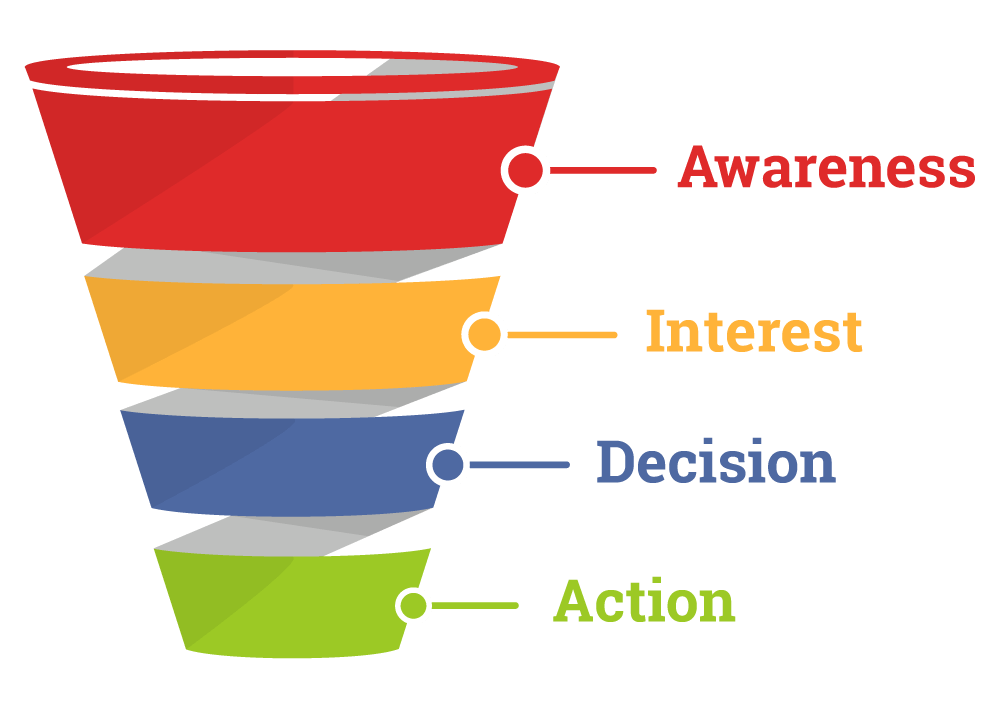
There is also another version of the sales funnel which is based on AIDA. This gives a clearer picture of how a sales funnel works. The AIDA structure of the sales funnel will consist of four stages instead of three which better defines the customer stages.
The four stages of the AIDA sales funnel are:
- Awareness. Grab the potential customer’s attention.
- Interest. Get them interested in your product.
- Desire. Make them want your product.
- Action. Encourage them to buy your product.
Here’s what it looks like:
The AIDA sales funnel works very well in defining a customer’s lifecycle in your sales process. But to implement it online, the co-founder of ClickFunnels, Russell Brunson had a new explanation for it.
The new sales funnel now consists of four stages:
- Bait (Top of Funnel). You offer the potential customer your lead magnet in exchange for their email address.
- Frontend(Middle of Funnel). You offer the potential customer your least expensive and least valuable product or service.
- Middle(Middle of Funnel). You offer the customer a more expensive and valuable product or service.
- Backend(Bottom of Funnel). You offer the customer your most expensive and most valuable product or service.
Ideally, you should always consider offering a continuity program or a subscription product that generates recurring revenue.
What Is the Value Ladder Sales Funnel?
To implement the sales funnel above, Russell taught about the concept called Value Ladder Sales Funnel.
Why do we call this a value ladder?
When your prospect is moving across the different sales funnel stages, we will offer a higher-value product with a higher price point.
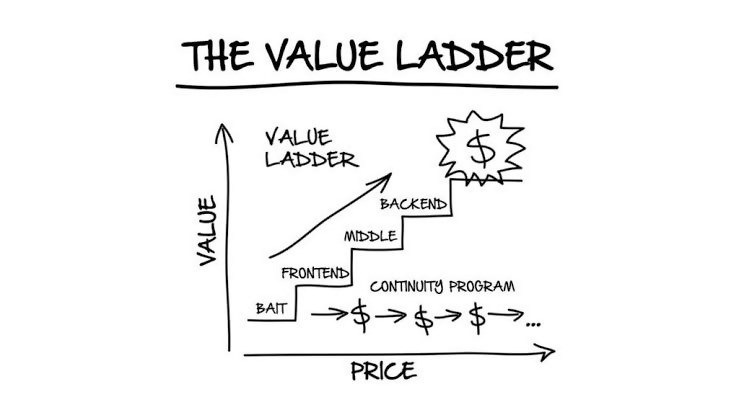
And in the front and middle stages, you can test for your market, to add downsells, upsells and cross-sells to maximize your revenue in your business.
And ideally, at the end of the funnel, after offering your most expensive or premium product/service, you can offer a continuity program. A continuity program is a subscription product that generates recurring revenue.
The reason why this sales funnel works so well is that it follows the buying emotion. By understanding human buying behaviour, it does:
- Start the relationship by offering free value. – Give before you sell
- Nurture that relationship by continuing to provide free value via a follow-up email. – follow up and trust
- Build trust by providing more paid value progressively. – Build subscriber
Depending on your sales funnel goal, you can add or remove some steps in the sales funnel to suit your business.
It all depends on what you are trying to accomplish.
To understand more about sales funnel in-depth, may check out the best-selling book by Russell Brunson, the co-founder of ClickFunnels and the creator of the value ladder sales funnel concept, about how to use sales funnel to grow and scale your online business.
You can get it for FREE – all you need to do is to cover the shipping!
How To Build a WordPress Sales Funnel in 5 Steps
So now, you already know about what is a sales funnel and how Value Ladder Sales Funnel works. It’s time to start building it out.
If you just managed to identify your value ladder without the entire product line ready, don’t worry. To get the work started, you will only need to identify your lead magnet and the front-end product.
Then, head to ClickFunnels and start building the sales funnel. Then integrate it with your WordPress with the ClickFunnels WordPress plugin.
Here’s how you can get started:
Step #1: Create a High-Value Lead Magnet
First of all, what is a lead magnet?
A lead magnet is a free resource that is offered in exchange for the visitor’s contact information, such as their name and email address. It is typically used as a marketing tactic to attract and capture leads and is often the first step in a sales funnel.
They are designed to provide value to the visitor and encourage them to give their contact information in exchange for access to the resource.
Lead magnets are an effective way to build trust and establish a relationship with potential customers. They allow businesses to capture leads and nurture them through the sales funnel, eventually converting them into paying customers.
A lead magnet can be anything that you offer to your website visitors to provide value for them. One of the best values you can provide would be something that is DFY (Done for you) and will have an instant result.

Also, normally it’s a digital product where you don’t need any cost to reproduce it. And they can get access to it instantly.
A typical lead magnet example:
- A report.
- An ebook.
- A video course.
- An email course.
- A webinar.
Depending on your offer, you might offer it as a free shipping offer where you give them a free physical product. But you ask the potential customer to cover the shipping and handling cost.
And in most cases, the shipping and handling cost should cover even your product cost.
Lead magnet offer is the foundation of your entire sales funnel. The key product is to convert your website visitors to leads, and from leads to buying customers.
Be very careful where you create your lead magnet. If it fails, your entire sales funnel fails. No one will even reach your front-end product.
And, you will not be getting a second chance to convert them.
Join our 5-Day Challenge today. It’s completely free!
Step #2: Create a Landing Page for Your Lead Magnet
Once you have your lead magnet, it’s time to create a landing page for it. This landing page does not need to be very complicated. A very simple squeeze page with three basic elements will do.
- An eye-catching headline that conveys the value of your irresistible offer.
- An opt-in form where the potential customer can input their contact details. Normally their email address. The opt-in form can be a form embedded in your page or a pop-up contact form that shows up when you click on the call-to-action button. Or even an exit popup that appears when they try to leave.
- A call-to-action button that encourages the potential customer to get the lead magnet offer.
These are the basic elements for the squeeze page. But you can also try adding in other elements like subheadlines, sales copy, social proof, etc.
These additional elements shall increase the conversion rate of your squeeze page. Just A/B tests different elements to find the best combinations for the best conversion rate.
You can also experiment with longer lead magnet landing pages. People who read all your long content will definitely convert.
Step #3: Create an Irresistible Frontend Offer
Now we are making real money. There is nothing earned yet as your lead magnet offer is free. Now, your front end is the first paid offer. This offer is not designed to make loads of money.
Instead, it’s to convert leads into paying customers. By offering a low-ticket front-end product, it will be easier for your leads to be converted to paying customers.
Here’s the formula for creating an irresistible frontend offer:
High value + Low Price = Irresistible Offer
That’s why, the frontend product as the second step in the value ladder sales funnel shall be high value, low price.
And for some reason, $7 is a great price point for this. This is because it’s not too cheap and your potential customers will question the value of the product. But at the same time, it’s not high enough to make them stop and think twice before buying it.
You want them to be able to make the buying decision easier.
To help remove their risk, you can also consider offering a guarantee. It can be a 30-day money-back guarantee, no questions asked. This will remove all their risk from the buying decision. The only risk would be their time testing out the product.
Step #4: Create a Sales Page for Your Frontend Offer
Now, your second webpage. The sales page for your front-end product. If you are aware, we are building one page for one step.
On this page, the most important is your sales copy. You need to convince your potential customers to make a purchase on this page. Hence, it is very important to implement your copywriting skill here.
The product feature does not sell, but the benefit sells.
For example,
- A feature is a quality or a function of a product (e.g. “A Supercar can go for 0-100km/h in X seconds.”).
- A benefit is a value that the customer will derive from that product (e.g. “The supercar will make you look cool!”).
Humans are emotional. They buy because of the benefits that the product brings instead of the features.
They want to buy the supercar to look cool and unique. Not because of how fast the supercar can go.
That’s why when you are crafting your sales copy, you should focus on the benefits instead of the features. From the headline to the sales copy and the call to action, you should focus on the benefits.
Remember this, purchase decisions are typically made based on emotion, not on logic, so that’s what you should appeal to in the sales copy.
You want to figure out what is ultimately driving the potential customer, then paint a vision that illustrates how your product will help them achieve what they want.
Want to learn more about copywriting? Check out Jim Edwards’ book “Copywriting Secrets”. You can get it for FREE, all he asks is that you cover the shipping!
Step #5: Create an Onboarding Email Sequence
Once someone claims the lead magnet offer and signs up for your email list, you should welcome them. You can do this by introducing them to who are you, what are you doing and what will they benefit from you.
To do this, you can create an onboarding email sequence where your build the stage first. And the sales pitch comes later. Don’t make them feel uncomfortable with your sales pitch too early.
You can create the welcome email sequence like this:
Email #1: Set The Stage
This is the first email you send. A hank you not e when they sign up for your list. In this email, you are going to introduce who are you and what to expect in the coming few days.
You are setting the stage for the emails to come in the next few days. At the end of the email, a glimpse into tomorrow’s email content for them to look forward to the next email.
Email #2: High Drama and Backstory
In this email, you start telling your story. We are going to use the story-selling process here.
Most people mistakenly start their stories at the beginning, but usually, stories don’t get good until the middle. So it’s better to start at the good part, and then you can go back and fill in the backstory after readers are hooked.
And once you have caught their attention it’s time to tell them a backstory. A story that they can relate to their life.
Here, you tell them what happens in your life that leads to that situation and then relates that to their life. For example, if you’re helping them to lose weight, you take them back to when you were overweight.
You want to be in their situation and show them how you went through the journey and achieve what you are now. You explain to them how you hit that wall and then found the answer. But don’t give them the answer yet. Just open the loop, and promise to close it in email number three.
Email #3: Epiphany
Now, it’s time to disclose what is the answer, the solution to their problems. Something that you had never thought of before although it might be something simple that is around you.
It’s the “aha” moment where after you discover it, everything changed and you achieve what you want. At the end of the epiphany email, you usually link it back to your core offer. The product or service you are selling solves the problem.
Email #4: Hidden Benefits
In this email, you are going to explain the benefits of the product/service you are offering. And how it can benefit them. Here, the focus shall not be the obvious benefits that they can figure out. But, it should be something that is not as obvious.
This email will point out the hidden benefits they may not have thought about before.
For example, if you are selling a weight loss product. Of course, they will lose weight after using your product. But other than losing weight, it also means better health and possibly a longer life to spend with their grandchildren.
Often, it’s the hidden benefits that really grab the reader’s emotions and make them take action.
That’s why your story is very important to show the hidden benefits. Get them to convince themselves that they need the item. And finally, click on the link to buy your product.
Email #5: Urgency + CTA
This is usually the last email in the Soap Opera Sequence. The ending of the welcome email sequence. You can always send other email sequences or newsletters to your prospects. But, this is closing for your introduction email.
The goal here is before you leave them, you give them the last push to take action. And, this is normally done by adding urgency to the offer. It’s either the time limiting factor where the offers are ending in XX hours or the quantity limiting factor where there is only a limiting quantity available.
Whatever the urgency is, it needs to be real. Fake urgency may backfire on you and they lose trust in you. If you are telling that the promotion is ending by today, then run until tomorrow. Or if it’s limited quantity, then when it’s gone, it’s gone.
The sense of urgency will make them FOMO and click your CTA button. In your previous email, you did have some CTAs embedded. But in this final email, you want them to take action deadly.
This is where you trigger the sense of urgency and emphasize your CTA button to tell them where to click now.
This email sequence is designed to establish a connection with the new subscriber by telling a story they can relate to. After you have built relationships with them, then only present them with your offer.
Hook, Story, Offer
We do also believe the framework of a good story is the “Hook, Story, Offer” copywriting framework.
- Hook. Grab the potential customer’s attention with an irresistible subject line.
- Story. Tell them a captivating story that resonates with them on a deep emotional level.
- Offer. The transition from the story to the offer and then to the call to action.
This is how we craft the story to bring our potential customers from a new lead to paying customers.
Join our 5-Day Challenge today. It’s completely free!
Final Thoughts – How To Build A Powerful Sales Funnel In WordPress
Building a sales funnel from scratch is not easy. To be able to connect to your existing WordPress site let you able to enjoy the best of both sides.
While WordPress is able to build landing pages too, it’s not as effective as ClickFunnels. ClickFunnels is designed and optimized for building a sales funnel.
To get started, you can join the free 5-Day Lead Challenge to learn all about how to generate unlimited leads with a sales funnel.
This includes creating your first lead magnet, building your first sales funnel, creating a simple onboarding email sequence and launching your funnel all in 5 days.
Let’s take action and join us now.