Starting a side hustle business by selling products or services has been an idea that many people thought of. However, you might think that starting an online store is hard or requires technical skills. The fact is, it can be easy to start one on your own even if you are not a tech expert. Let’s learn about How to Start an Online Store with WordPress WooCommerce.
With the development of the ecommerce business, many website builders make it simple for anyone to start and build their website without any coding knowledge.
And today, we will share step-by-step how to build an online store from scratch.
Why Do You Need to Start an Online Store?

With the continuously growing trend of ecommerce business, starting an online store can be a lucrative side hustle or business that you can build for long-term growth.
Compared to a physical business, an online store is easier to start as it requires lower overhead costs. You don’t need to have a huge inventory, physical store and other utilities to start.
Not only that, you can manage your online store entirely from your laptop or smartphone only. Anywhere and anytime you want. Also, without the physical store limitation, you can now expose your business to the world. As long as the customers are connected online, they can find your store.
What Do You Need to Start an Online Store?
If you have the idea of starting an online store, don’t ever think of the question of when is the best day to start an online business. The best answer is always now.
There’s nothing too early to start anything you want as long as you have an idea that is best to implement here right away.
If you are thinking that you will need skills or skills in order to start an online store you are totally wrong with the website builder today you can actually start an online business within minutes without any special skills.
There are so many website builders out there that are able to build online stores easily. This includes platforms like Wix, Shopify and WordPress.
Today we are going to show how to build your online store from scratch by using the CMS platform WordPress. There are many different platforms out there for building an online store, but today we are to share how to build a WordPress online store.
To build an online store, you will need a web hosting service, a domain name, and get WordPress installed.
It might sound like a lot of things to do, but if you are able to follow our guide today you can also set up your online store with WordPress in just less than 30 minutes
Step 1: Setting up Your Online Store

If there are so many website builders, it is crucial that you start with the right platforms for your online store. This is because if you are on the wrong platform it will be a hassle for you to migrate from one to another in the future.
In the market, there are two most popular e-commerce building platforms. We recommend Shopify and WordPress. the reason for us to recommend this to the platform is because of the easiness and simplicity of building an online store
Shopify vs WordPress WooCommerce
Shopify is a fully hosted complete solution that starts at $19 per month. You need to pay the monthly subscription fee in order to run your website. It’s a hassle-free solution you will just need to go to Shopify and subscribe to the plans, everything else is handled by Shopify. You can start with the lowest plan when you just start your stop and just upgrade the plan when your business grows.
As Shopify works as a complete ecommerce solution, the cost for Shopify is slightly higher compared to a self-hosted WordPress online store. This is why some business owners choose WordPress for their online store but if you’re looking for a complete solution that is fully managed Shopify is the choice.
WordPress is a CMS platform. You can build different websites using WordPress. This is why the basic WordPress site is built to be lightweight and simple. And in order to add the ecommerce function to a WordPress site, you will need to install the eCommerce plugin called WooCommerce.
By running a self-hosted WordPress online store, you are able to have full control of your website. This means you can choose the web hosting provider service that you want and customise it to the look and feel that you want.
Today, we will be sharing a step-by-step guide on how to create an online store in WordPress using WooCommerce.
To set up your eCommerce store, you will need a web hosting service, domain name, and SSL certificate.
Web Hosting
Web hosting is a service that allows individuals and organizations to publish their websites on the internet. When you purchase web hosting, you are essentially renting a server or a space on a server where your website files can be stored and visited by your visitors.
Domain Name
A domain name is a unique name for a website on the internet. It acts as the address that people type into their web browser to access a website. For example, the domain name for Google’s website is “google.com”. When a user types “google.com” into their web browser, the browser connects to the server hosting the website and retrieves the website files, which are then displayed in the browser.
SSL Certificate
An SSL (Secure Sockets Layer) certificate is a type of digital certificate that is used to secure a website and protect the privacy of its visitors. An SSL certificate is essentially a set of data that is installed on a website’s web server and used to encrypt data transmitted between the server and visitors’ web browsers.
This is very important for an eCommerce site as you are processing payments on your online store. And definitely, you don’t want any data leakage issues.
Here, I will show you how you can get all these items in one place with the domain name and SSL certificate for free.
This is a bundled offer by Bluehost, an official WordPress-recommended web hosting provider. If you are subscribing to any Bluehost web hosting package, you will get a free domain name and free SSL together with your subscription.
And, the monthly subscription only costs $2.95/month after the discount.
Bluehost is one of the very famous web hosting service providers that host millions of websites worldwide. With a long track record and reliability, Bluehost is a good option if you want to start a WordPress website.
1. Choose a hosting plan
There are different web hosting plans offered by Bluehost, you can start with shared hosting, VPS hosting, dedicated hosting or even WordPress hosting.
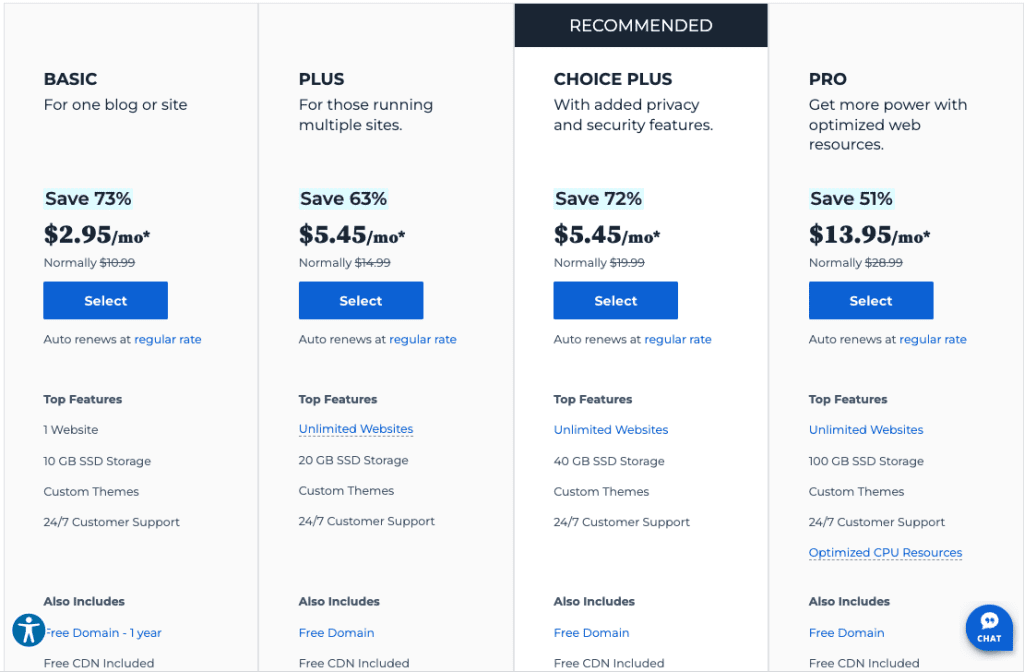
To help you choose the plan, you can read our WordPress plan review or simply start with a shared or WordPress hosting plan. It starts at just $2.95 per month.
2. Picking a new domain name
With all the Bluehost plans, you will get a free domain name for the first year.
Once you have selected your hosting plan, select Create a New Domain to choose your free domain name.
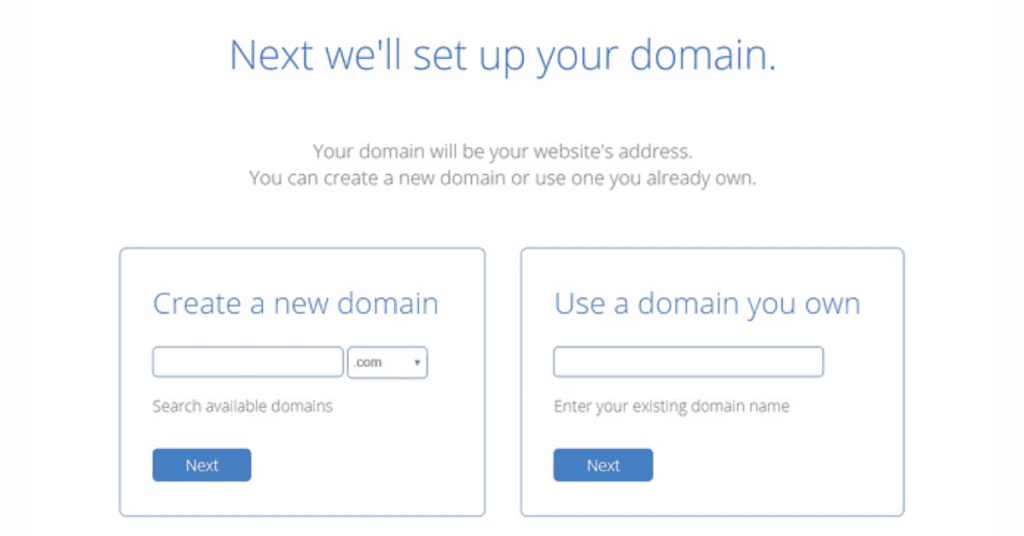
If you already have your domain name registered with the third-party domain registrar, you can use it here. Else you can type in your chosen domain name and see if it’s available.
To use your own domain name, you will need to configure the DNS to point your domain name to Bluehost’s nameservers.
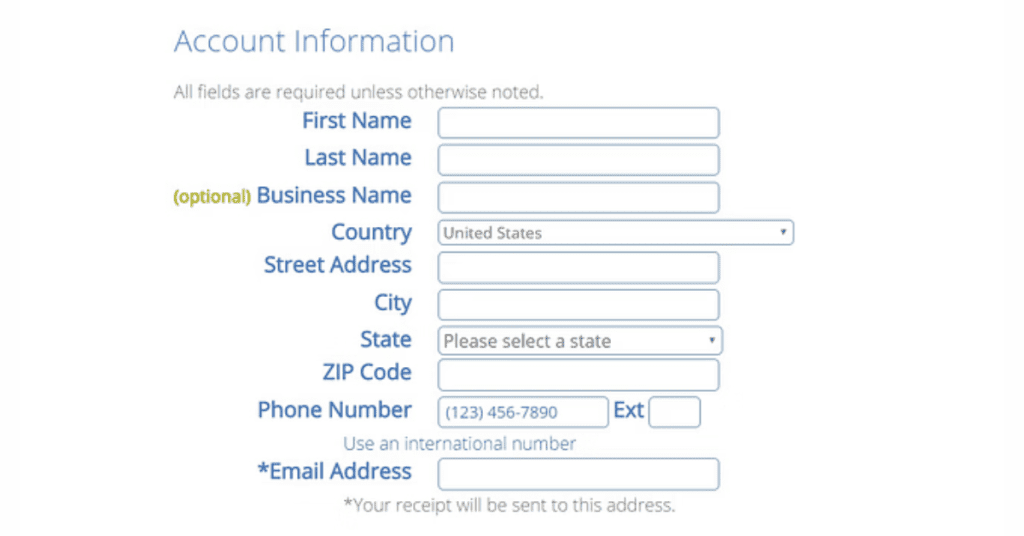
3. Enter Bluehost account information
Next, Bluehost will ask you to fill out some personal information to create your account. Or, you can sign in with Google.
4. Confirm hosting plan details
Now, it’s time to make payment. Bluehost will list down all included in your list, with some add-ons. These add-ons are extra services that are charged separately. Hence, you need to be careful and select those required only.

For now, we would suggest unticking all. You can select the addons later when you need them.
Under Account Plan, you can also set the number of years you want to sign up Bluehost for. The minimum commitment is 12 months, but you can get a bigger discount if you commit up to three years in one shot.
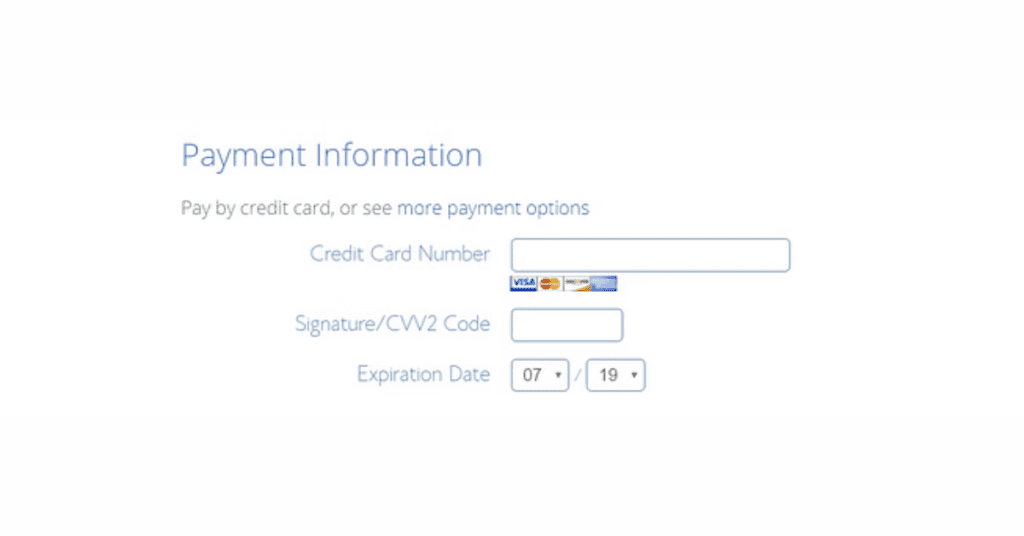
5. Enter your payment details
The last step in the Bluehost sign-up process is to enter your payment details and complete the checkout.
Bluehost will now go ahead and set up your new hosting plan and domain name. You will then receive an email with payment confirmation as well as your new account information, including login and password details.
As a satisfaction guarantee, Bluehost provides a 30-day money-back guarantee. If you are unhappy with your plan or the hosting service within 30 days, you can always ask for a refund.
Step 2: Installing WordPress on Bluehost – How to Start an Online Store
Now you have the hosting and domain both ready, it’s time to install WordPress. As Bluehost has a simple one-click installation feature for WordPress, you can install it easily.
1. Log in to Bluehost
To start:
- Log in to your new Bluehost account.
- Go to the My Sites tab.
- Click the Create Site button in the top-right corner.

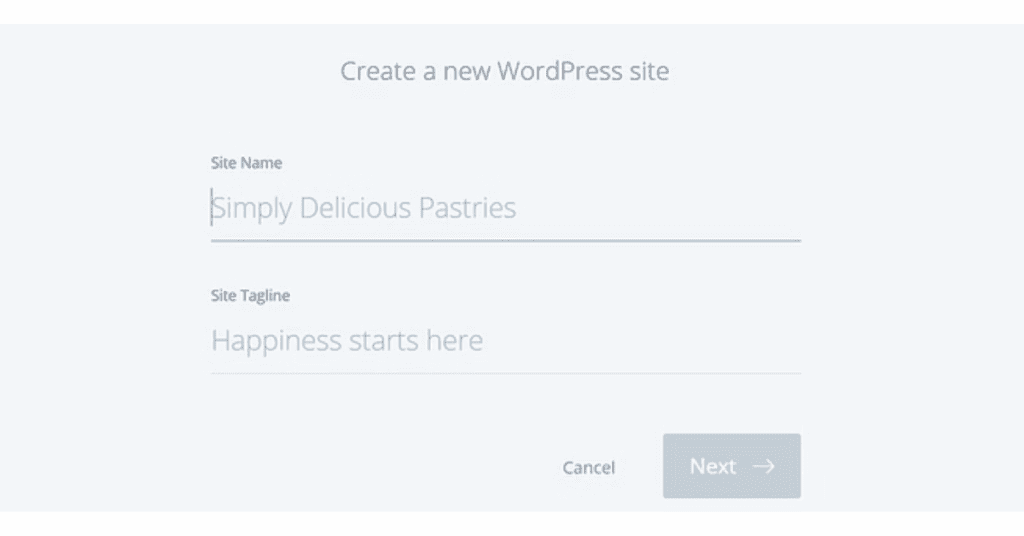
2. Enter your website info
Next, you need to enter some basic information about your website, including the Site Name and Site Tagline.
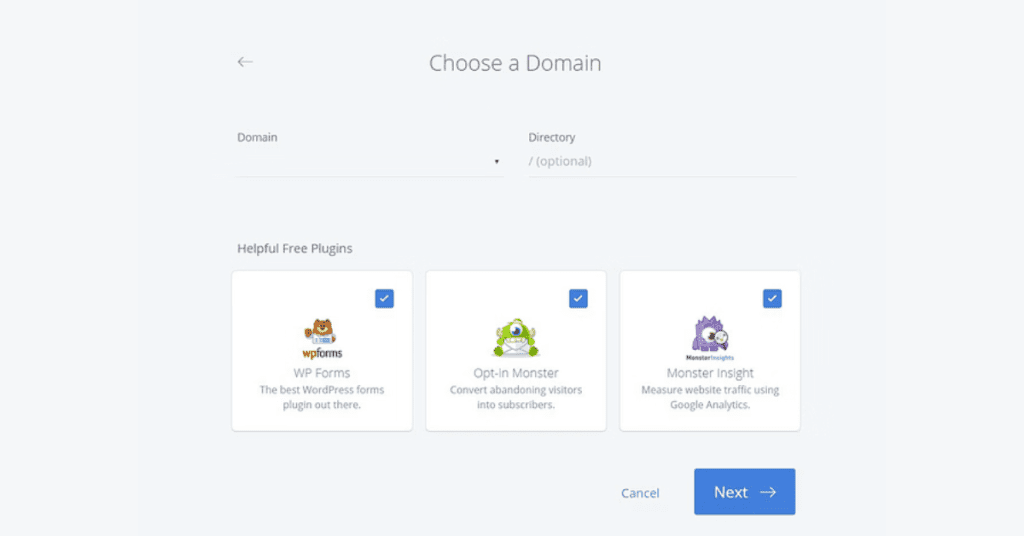
3. Choose your domain name
Use the Domain drop-down to select the domain name that you chose when you created your Bluehost account.
You can also choose whether or not to install some of Bluehost’s recommended plugins.
4. Click “Next” to install WordPress on Bluehost
Bluehost will now install WordPress for you, create your new WordPress website, and display your login details.
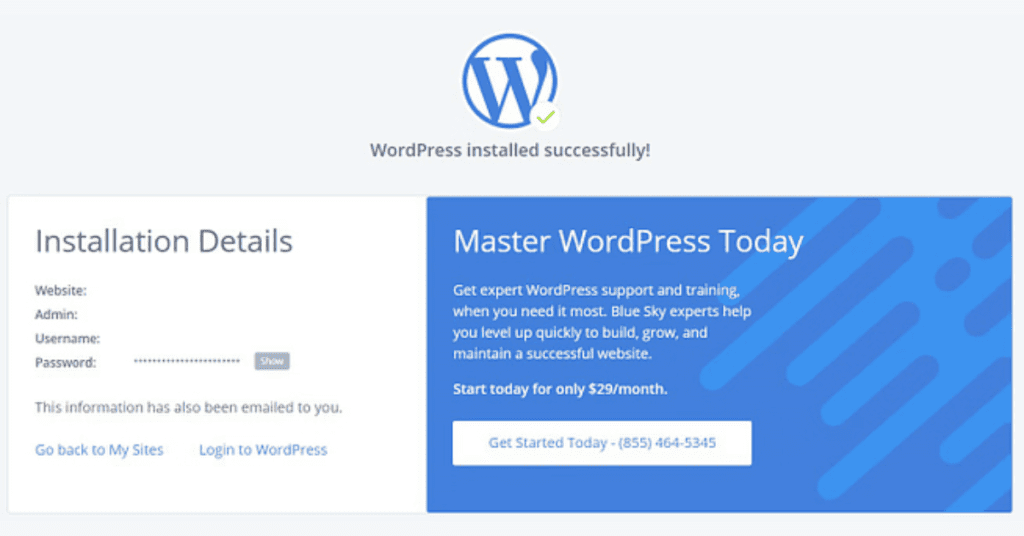
Once completed, you will receive an email with details on how to log in to your web hosting control panel (cPanel). This is where you manage everything from support to emails, among other things.
Once you are logged into the cPanel, you’ll notice that Bluehost has already installed WordPress for you and you can simply click on the ‘Log in to WordPress’ button.
Now that you have your WordPress fully installed and live, it’s time to set up your WordPress and your online store.
Step 3. Setting up WordPress
Now that your WordPress is installed, there are a few basic configurations that you need to set up.
First, you need to visit the Settings » General page to set up your WordPress site title and description.
This is your site identity. You can put your business or brand name that you have chosen, then write a compelling description for your business.
Setting up HTTPS to Use SSL
As your WordPress hosting package came with a free SSL Certificate. This certificate is pre-installed for your domain name. So, you need to change the URL here from HTTP to HTTPS However, your WordPress site needs to be configured, so it loads as HTTPS vs HTTP.
On the Settings » General page, you need to change your WordPress Address and Site Address to use HTTPS instead of HTTP.
Your basic WordPress setup is complete. Now it is time to add the online store feature to it.
Step 4. Setting up Your Online WooCommerce Store
WordPress itself is a plain website. To create an online store, we will be using the WooCommerce plugin. WooCommerce is the best WordPress plugin for eCommerce. You can leverage the flexibility of WordPress+WooCommerce to build a professional online store and start making money.
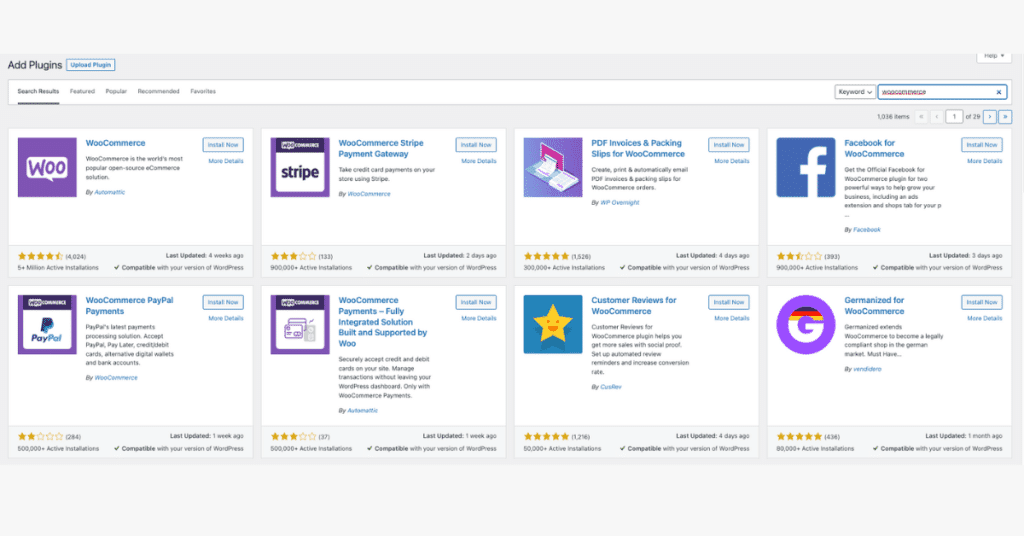
First, you need to install and activate the WooCommerce plugin.
At your left sidebar, go to Plugins » Add New and search for WooCommerce. In the search results, click on the Install Now button next to the WooCommerce listing.
Wait for it to be installed, and then activate it. Upon activation, WooCommerce will launch the setup wizard. Go through the setup wizard and input all the required information.
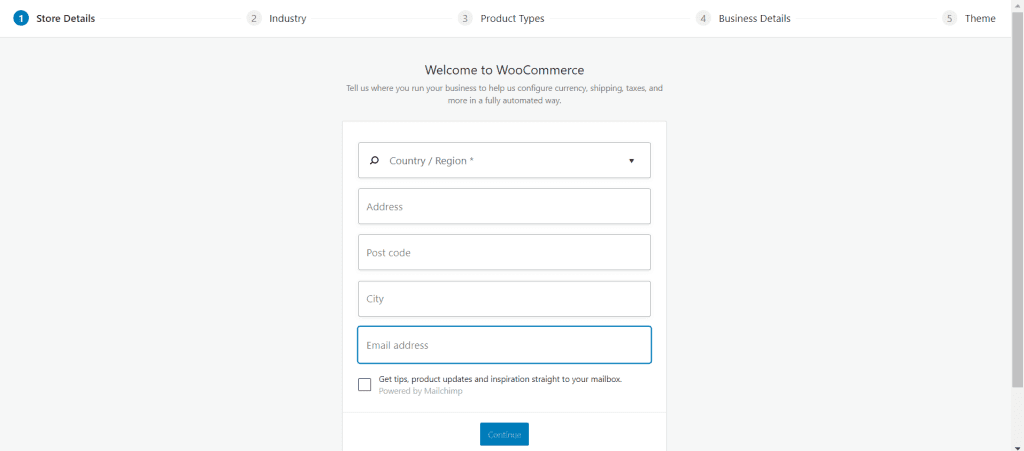
At the end of the setup wizard, you will be asked to choose your online store theme. You can continue with your current theme or a WooCommerce theme. There are both free and paid themes available. Just choose one and proceed. You can always change it later.
Step 5. Set up Payment Processor for Your Online Store – How to Start an Online Store
Now, not only you should be able to sell, but collecting payment is equally important. We will now set up the payment processing for your online store.
WooCommerce supports a few different payment gateways that you can set up easily.
Simply go to the WooCommerce » Settings page and switch to the ‘Payments’ tab. By default, you can choose from PayPal Standard, Cash on Delivery, Checks, and Bank Transfers.
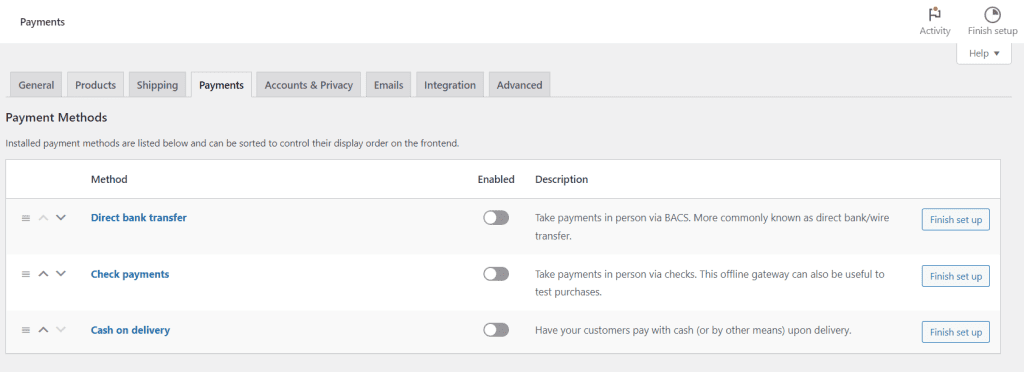
And if you scroll down, you will also see the option to install Stripe, PayPal Checkout, and WooCommerce Payments. We recommend choosing Stripe and PayPal as your payment options.
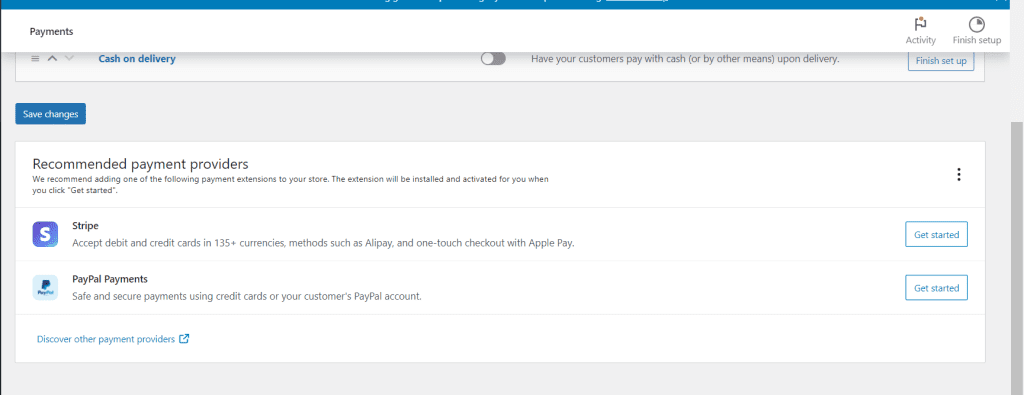
For each payment gateway, you can click on the Set up button and provide the required information. For instance, you can enable Stripe and enter your API Keys.
Step 6. Adding Products to Your Online Store
Let’s add your first product to your online store. You need to go into WooCommerce » Products » Add New page to add a new product.
First, provide a title and a detailed description of your product.
On the right-hand column, you will see the ‘Product Categories’. Click on the ‘+Add New Product Category’ to create a category for this product. This allows you to sort your product so your customer can browse them easily.
Scroll down and you will notice the Product Data box. This is where you will provide product-related information like pricing, inventory, shipping etc.
Below the product data box, you will see a box to add a product short description. This is the product description that will be used when users are viewing multiple products on a page.
Finally, in your right-hand column, you will see boxes to add a main product image and a product gallery.
Once you are done with all the product information, you can click on the Publish button to make it live on your website.
You may want to add up to 10 products when starting out and add on other products regularly when it’s made available.
Step 7. Select and Customise WordPress Theme
A WordPress theme is like a new outfit for your website. It’s how your website looks and feels, just like how a new outfit can change how you look and feel.
A theme is made up of different parts, such as colours, fonts, and images. It also includes the layout and structure of your website, such as where the menu and different elements are placed on the page.
There are many different themes to choose from, both free and paid. You can easily change your theme in WordPress, so if you want to give your website a new look, you don’t have to start from scratch or learn any code. Just pick a new theme and your website will instantly have a whole new look.
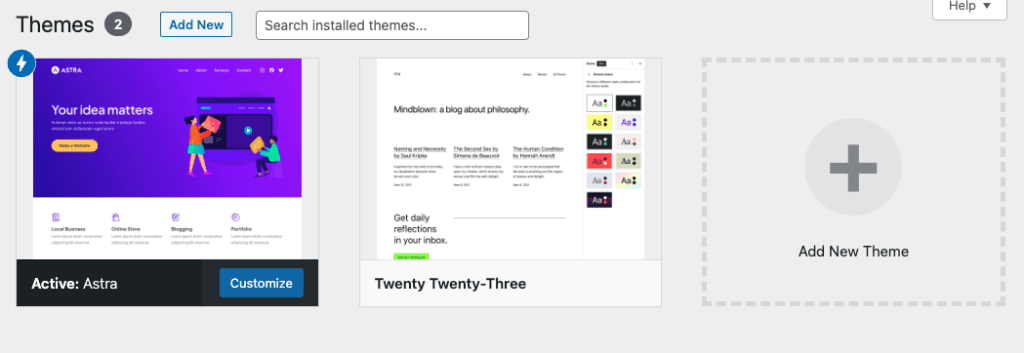
However, not all WordPress themes are designed specifically for eCommerce stores. We will use the Astra theme for this guide. You can search for “Astra” on the Theme store. It’s free to install and use.
In the Astra theme, there is a starter template that you can install to your WordPress site, and instantly all the basic required pages and related plugins will be installed together.
After you have done installing the Astra theme template, you can start customizing it to the look and feel you like.
Simply head over to the Appearance » Customize page. This will launch a theme customizer where you can change different theme settings.
Step 8. Install Other Plugins for Your Online Store -How to Start an Online Store
At this point in time, your online store is live and ready to sell. However, there are some important features that you will need for a successful online store. For example, it can be a pop-up, contact form, customer support, social media sharing and others like SEO optimization.
This is where you will need a plugin.
Plugin is a small piece of software that you install on your WordPress website to add additional features to it. And this is the magic for creating a lightweight WordPress website by adding only the features you really need.
There are thousands of plugins in the WordPress plugin store, both free and paid. It might be tempting to install all the different plugins on your website. However, you shouldn’t do that as the more plugins installed, it will only add weight to your website, causing it to load slowly.
To help you with a better choice, we have listed a few useful plugins that you should install on your website.
1. OptinMonster
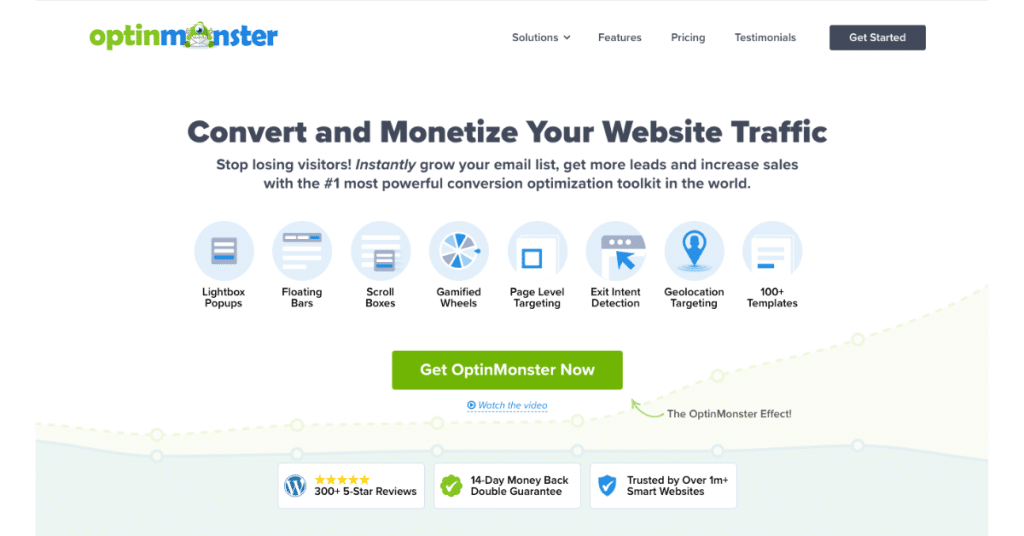
Lead generation and customer retention are one of the most important things in every business. For every visitor that visits your online store, they might not be buying from you during the first visit. This is why you want to collect their contact details and follow up with them later via emails or social media. The more touch points you have, the better you can follow up and convert them.
Optinmoster offers different kinds of opt-in form tools like lightbox popups, sticky header and footer banners, countdown timers, spin to win, and more.
All of them help to improve conversions, boost sales, grow your email list, and reduce shopping cart abandonment.
2. WPForms
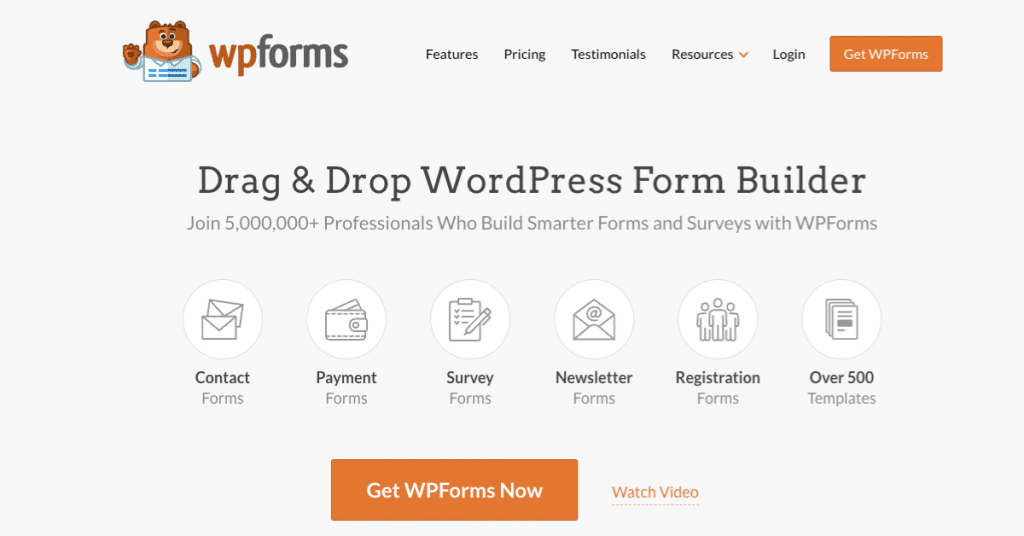
Other than pop-ups, you will need different contact forms in your online store to interact with your potential customers. WPForms is easy to use and create with its intuitive drag-and-drop form builder functions. It allows you to just point and click to create forms.
3. AffiliateWP
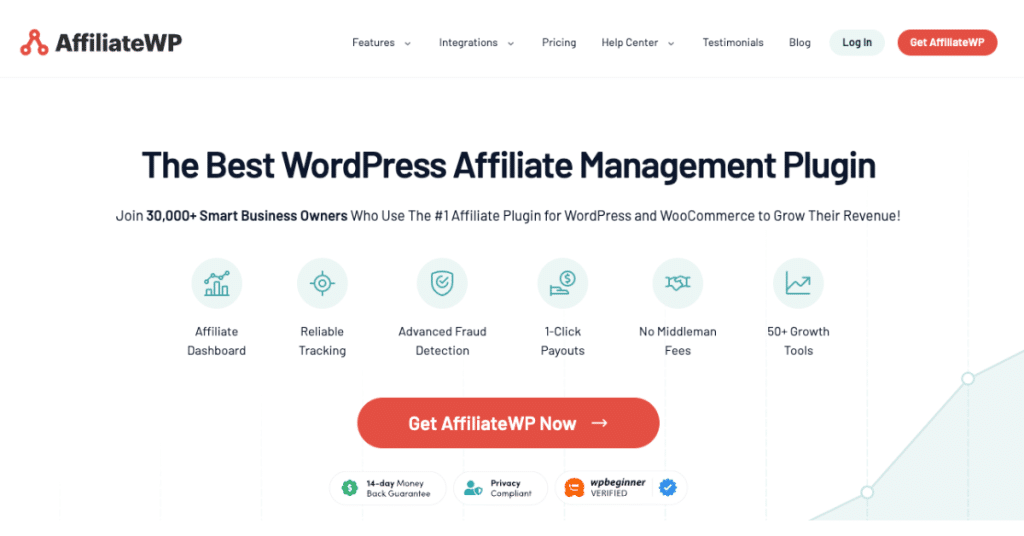
As part of the marketing strategies, affiliate marketing is very useful to tap into the audiences of influencers or affiliate marketers to promote your product, and you only pay them for successful referrals.
Affiliate marketing is a good strategy to build and grow your business fast by getting on to the right group of audiences. Just that you will definitely need to collect their email address or other contact details to get them into your email list to nurture them to be your paying customers.
AffiliateWP comes with powerful affiliate tracking, no transaction fees, fraud detection, 1-click payouts, and an affiliate dashboard for your partners.
4. Yoast SEO

Yoast SEO is one of the best SEO plugins for WooCommerce. SEO is the optimization strategy for your online store to rank organically on the search engine. When you are ranked at the top for highly searched keywords, you will be getting lots of free organic traffic to your website.
It comes with full eCommerce support, schema markup, sitemaps, breadcrumbs, and more. This helps you bring more traffic to your online store.
5. MonsterInsights
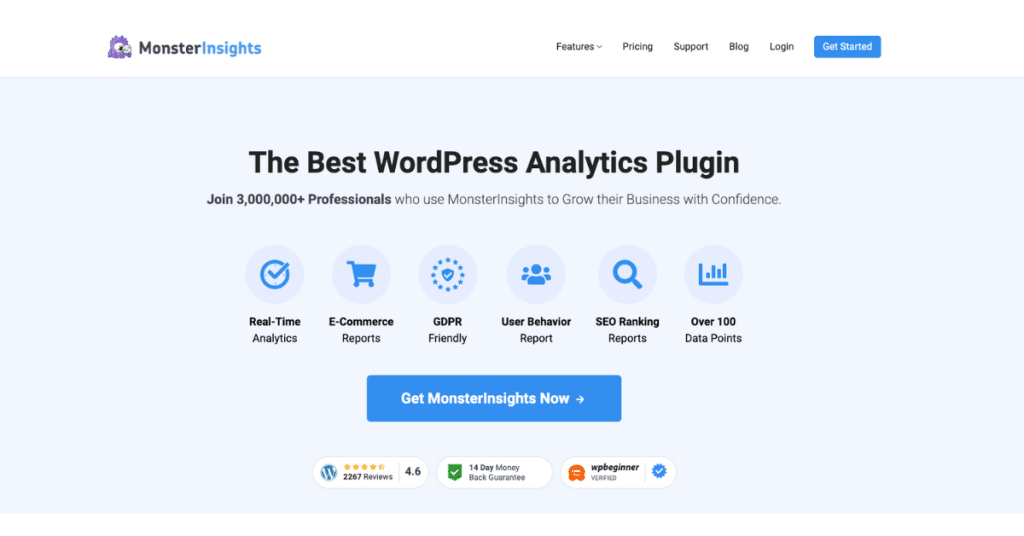
Data analysis is one of the very important things for understanding and growing your online store. MonsterInsights is the best Google Analytics plugin for WordPress. It helps you see where your customers are coming from and what they do on your website.
Not only that, MonsterInsights comes with WooCommerce tracking so you can see the conversions and sales data on your website. This helps you adjust your marketing strategy and grow your small business with data-driven decisions.
Final Thoughts – Build Your WordPress Online Store
Building an online store from scratch can be easy if you are following the steps above. If you are still wondering about it or having some issues during your journey of creating your online store, feel free to leave a message on our contact page. Our team will support and help you with the process.
WordPress is a very powerful platform with an unlimited possibility of creating powerful websites. You never know the result without doing it. And one of the regrets that many people have, is to start too late.
If you decide to start it today, do get an exclusive discount for web hosting.