If your WordPress site isn’t updating as expected, loading slowly, or showing outdated content, chances are it’s time to clear your cache. Caching plays a critical role in website performance, but sometimes, it needs a reset.
In this comprehensive guide, we’ll walk you through how to clear your WordPress cache using popular tools like WP Rocket, WP Fastest Cache, and W3 Total Cache. Whether you’re troubleshooting design changes that aren’t showing up or trying to resolve performance issues, knowing how to properly clear your cache can save you time and frustration.
What Is WordPress Caching and Why Does It Matter?
Caching is a performance-enhancing technique that stores copies of your website’s pages, images, or files to serve them faster to returning visitors. Think of it as your favourite coffee shop remembering your order. It speeds up the experience and reduces wait time.
Here’s how caching works across different areas of your WordPress ecosystem:
- Browser Caching: Your visitors’ web browser saves static content (like stylesheets, images, and scripts), so it doesn’t have to reload everything each time.
- Page Caching: WordPress caching plugins generate and store static versions of dynamic pages to minimize database queries.
- Server-Side Caching: Some web hosts implement caching at the server level, such as object caching or full-page caching, to boost site speed even further.
While caching significantly improves load times and user experience, outdated cached content can cause issues, like missing updates or broken functionality. That’s why it’s essential to know how to clear your cache in WordPress properly.
In this post, we’ll cover five reliable ways to clear all your WordPress caches, including plugin-based methods, browser cache clearing, and even server-side options.
Let’s get started with the easiest methods first.
How to Clear Your WordPress Cache With Plugins
Let’s get to the core of what you’re here for: how to clear your WordPress cache the right way. Whether you’re troubleshooting a design change that won’t show up or speeding up your site’s performance, clearing the cache is often the first and most effective step.
The good news? Most WordPress caching plugins follow a similar process. So even if your plugin isn’t listed here, the steps will likely feel familiar.
Below, we’ll walk you through how to clear the cache using some of the most popular WordPress caching plugins.
1. How to Clear WordPress Cache in WP Rocket
WP Rocket is one of the most user-friendly caching plugins available, and clearing the cache is just as simple as everything else it offers.
Here’s how to clear the cache in WP Rocket:
- Log into your WordPress dashboard.
- In the top admin toolbar, hover over the “WP Rocket” menu.
- Click on “Clear Cache” from the dropdown options.
That’s it! WP Rocket will immediately purge all cached files across your site, ensuring your visitors see the most up-to-date version of your pages.
You can also clear specific caches like CSS/JS or regenerate critical CSS under Settings > WP Rocket, giving you more control when needed.
2. How to Clear WordPress Cache in W3 Total Cache
W3 Total Cache is a powerful plugin with granular caching options, meaning you can purge everything or clear individual cache types.
Method 1: Purge All Caches from the Toolbar
- Head to your WordPress dashboard.
- In the admin toolbar, hover over “Performance.”
- Select “Purge All Caches.”
All cached files, including page, object, and database cache, will be cleared at once.
Method 2: Clear Individual Cache Types
- Go to Performance > General Settings.
- Scroll through the caching sections.
- Click the “Empty Cache” button next to each section (Page Cache, Minify, Database Cache, etc.).
If the button isn’t clickable, it means that specific cache module isn’t enabled on your site.
This flexibility makes W3 Total Cache ideal for advanced users who want full control over their caching layers.
3. How to Clear WordPress Cache in WP Fastest Cache
WP Fastest Cache gives you two convenient ways to clear your site’s cache either all at once or along with minified CSS/JS files.
Quick Method from the Toolbar:
- From your dashboard, locate the “Delete Cache” option in the top admin bar.
- Hover over it, and choose one of the following:
- Delete Cache – Clears all cached pages.
- Delete Cache and Minified CSS/JS – Clears both cached pages and minified files, which is helpful after plugin or theme updates.
From the Plugin Settings:
- Go to WP Fastest Cache > Delete Cache in your dashboard sidebar.
- Choose the same two options mentioned above.
Clearing your cache here is fast and beginner-friendly, perfect for anyone who wants a quick reset without diving into complex settings.
How to Clear Your Browser Cache (Chrome, Safari & Firefox)
When you’re making frequent updates to your WordPress website, it’s not just your site’s server or plugin cache that needs clearing. Your browser cache can also cause old content to stick around longer than it should.
Browsers store cached versions of web pages, images, stylesheets, and scripts to improve loading speeds during repeat visits. This can be helpful for general browsing, but it can lead to confusion when you’re making changes to your website and they don’t seem to appear.
That’s why clearing your browser cache is an essential part of WordPress troubleshooting. Below, we’ll show you how to clear the cache in the most popular web browsers: Google Chrome, Safari, and Mozilla Firefox.
Google Chrome: Clear Cached Files in Seconds
Chrome is a favorite among WordPress users, but its efficiency can work against you when cached files become outdated.
Here’s how to clear your cache in Chrome:
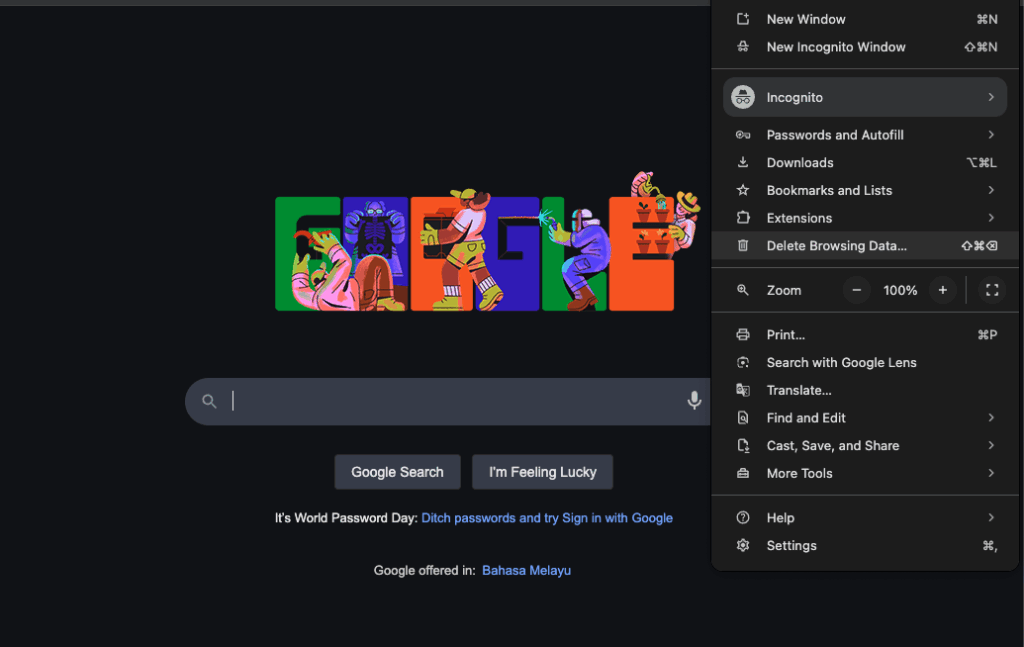
- Open Chrome and click the three-dot menu in the top-right corner.
- Hover over “More tools”, then select “Clear browsing data.”
- In the popup window, choose the time range. For a full reset, select “All time.”
- Check the box labeled “Cached images and files.” You can uncheck other boxes if you only want to clear the cache.
- Click “Clear data.”
Once complete, Chrome will remove all saved cache files, and your site changes should now appear correctly.
Safari: Clear the Cache for a Fresh Start
If you’re using Safari on macOS, you’ll need to enable the developer tools to access cache clearing options.
Follow these steps to empty your Safari cache:
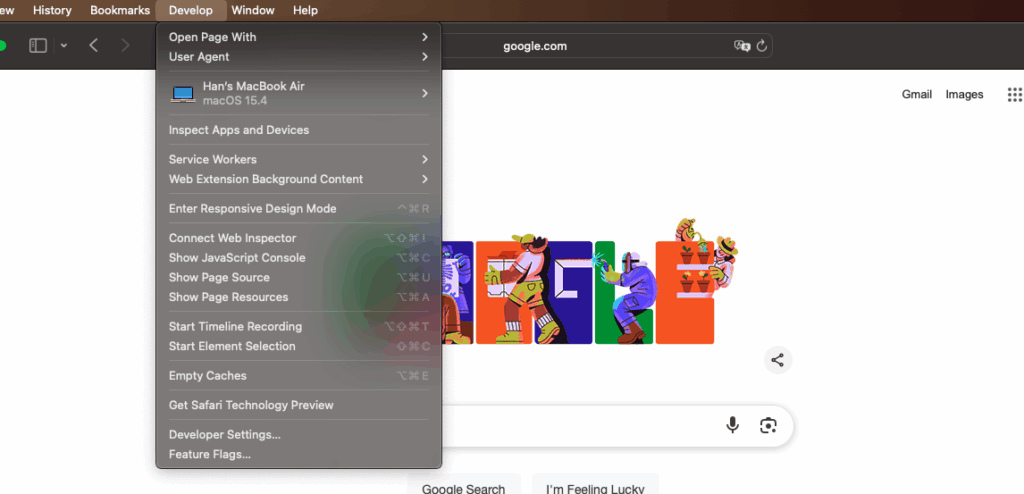
- Open Safari and go to Safari > Preferences in the menu bar.
- Click on the Advanced tab.
- Check the box for “Show Develop menu in menu bar.”
- Close Preferences, then go to the top menu bar and click Develop > Empty Caches.
That’s it! Safari has now purged all cached content, which should help reflect the latest updates on your WordPress site.
Mozilla Firefox: Remove Stored Cache Instantly
Firefox users can also quickly clear their browser cache with a few clicks.
Here’s how to do it in Firefox:
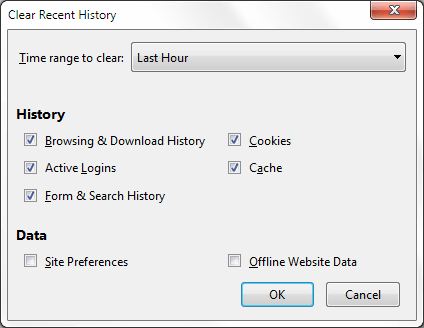
- Click the menu icon (☰) in the top-right corner.
- Navigate to History > Clear Recent History.
- Under “Time range to clear”, select a time frame (we recommend “Everything”).
- Check the box for “Cache.” You can leave other options unchecked if you’re only clearing cached files.
- Click OK to confirm.
Firefox will then clear all cached data within the selected time range, helping you see your site updates without interference from old files.
If you’re seeing outdated designs, broken layouts, or unchanged content after editing your WordPress site, the issue might not be on your server. It could be in your browser. Clearing the cache ensures you’re seeing a fresh, accurate version of your website.
You don’t have to clear your browser cache daily, but doing it regularly, especially after site changes, can save you from a lot of confusion and help you troubleshoot WordPress issues more effectively.
How to Clear Your Hosting Cache in WordPress (Using cPanel or Site Tools)
Did you know that your WordPress hosting provider may also store cached versions of your site’s content? This type of caching, often handled at the server level, helps websites load faster, but like browser and plugin caching, it can cause issues when changes don’t appear immediately.
Not all caching is handled within WordPress. Many managed WordPress hosting providers implement server-level caching to boost site speed. Clearing this type of cache usually requires logging into your hosting control panel or dashboard.
Here’s how to clear server cache with some of the most popular web hosts:
Bluehost
Bluehost offers a built-in caching feature that can be easily accessed directly from your WordPress admin area. To get started, simply log into your WordPress dashboard.
Once you’re logged in, navigate to the top admin bar where you’ll find a menu labeled “Caching.” Click on this menu, and then select “Purge All” to clear the entire server-side cache.
By doing so, you refresh all cached assets across your site, ensuring that any recent changes you’ve made are immediately reflected on the live version of your website.
SiteGround
If you prefer managing your cache directly from Site Tools, start by navigating to Site Tools > Speed > Caching. Once you’re in the Caching section, locate the Dynamic Cache tab. Here, click the menu icon next to your domain, and from the dropdown menu, select “Flush Cache.”
This method is particularly helpful if you’ve made design or functionality updates and want those changes to be reflected immediately on the front end of your site.
Hostinger
Hostinger users can easily manage caching through the hPanel control panel. To get started, first log in to your hPanel dashboard. Once you’re logged in, scroll down to the Advanced section and click on “Purge Manager.”
After that, select “Purge Cache” to instantly clear all server-side cached files. This quick step can help resolve any display issues that may arise from outdated content stored on Hostinger’s servers.
Even after clearing your browser and WordPress plugin caches, lingering server-side cache may still prevent you from seeing the latest version of your site. That’s why it’s important to also manage your hosting cache, especially if you’re working with managed WordPress hosting or CDN services.
How to Clear CDN Cache in Cloudflare (Purge All Cached Files)
If your website uses a Content Delivery Network (CDN) like Cloudflare, it’s likely that cached versions of your pages, images, and scripts are being served from multiple data centers around the world. This is great for performance but when you make changes to your site, those cached versions can become outdated.
Luckily, clearing cache in Cloudflare is quick and straightforward. Here’s how to do it the right way:
Steps to Clear Cloudflare Cache (Purge Everything)
To clear your Cloudflare cache, start by logging into your Cloudflare dashboard at dash.cloudflare.com. Once logged in, select the website (domain) you want to manage.
From the left-hand sidebar, navigate to Caching and then click on Configuration. Alternatively, you can use the Quick Actions panel on the dashboard and click directly on Purge Cache.
Within the Purge Cache section, click the “Purge Everything” button. A confirmation window will appear, warning you that purging all cache may temporarily slow down your website as the cache rebuilds.
To proceed, click Purge Everything again to confirm. Cloudflare will then begin clearing its global CDN cache for your site, ensuring that visitors see the most up-to-date version of your content.
Should You Always Purge Everything?
While purging everything is effective, it’s worth noting that Cloudflare also allows custom cache purging. If you only made changes to a few specific pages or assets (like a new logo or updated CSS file), you can choose “Custom Purge” and enter those exact URLs instead. This method helps retain performance by keeping other cached files intact.
Bonus Tip: Hosting-Level CDN and Cache Tools
Many managed WordPress hosts now integrate CDN and caching features directly into their dashboards, often using tools like Cloudflare, NGINX, or custom caching plugins. This makes performance optimization and cache management much easier for users, without the need for third-party setups.
For instance, Bluehost offers a built-in caching plugin that enables one-click cache clearing, eliminating the need to log into your hosting account. Similarly, SiteGround and Hostinger provide CDN integrations and cache management tools within their control panels or site tools, streamlining the process of managing site performance.
Pro Tip: When troubleshooting issues where changes aren’t appearing on your live site, always remember to purge your CDN cache last. Be sure to first clear any plugin-level and hosting-level caches, as this ensures that outdated content is fully removed across all layers.
Final Thoughts: 5 Effective Methods to Clear WordPress Cache
In this guide, we walked you through how to clear your WordPress cache across popular caching plugins (like WP Rocket, W3 Total Cache, and WP Fastest Cache), browsers (such as Chrome, Safari, and Firefox), hosting providers (including Bluehost and SiteGround), and CDN services like Cloudflare.
While caching is essential for speeding up your website and improving performance, it can sometimes cause outdated content to persist, especially after design or content updates. Fortunately, as you’ve seen, clearing the cache is a straightforward process once you know where to look.
Whether you’re troubleshooting display issues or simply optimizing your site, regularly clearing your cache across all layers, plugin, browser, server, and CDN ensures your visitors always see the most updated version of your website.