If you’ve ever wondered how to put a picture on a shirt, whether for personal expression or to launch your custom t-shirt brand, you’re in the right place. Today, there are more options than ever to turn your favourite photo, graphic, or design into wearable art. From beginner-friendly DIY tricks to modern print-on-demand (POD) services that require no equipment at all, you can easily create custom t-shirts right from your home.
In this guide, we’ll break down how to transfer a picture onto a shirt with and without equipment, how POD works, and how to choose the best materials and printing methods for long-lasting results.
Start Selling with Printify Today
Use Print-on-Demand to Put a Picture on a Shirt
If you don’t own a printer, heat press, or transfer paper, don’t worry, you can still get a professional-looking custom t-shirt without investing in any gear. The simplest method? Print-on-Demand (POD).
Platforms like Printify, Printful, and TeeSpring allow you to upload your image online, choose a shirt style, and customize the design directly in their editor. Once you’re happy with your design, the platform handles everything else. Printing, packaging, and shipping, so you never have to touch a shirt or a shipping label.
Why Choose Print-on-Demand?
- Zero upfront cost – No need to buy blank t-shirts or printing equipment.
- No inventory – Orders are printed only when someone buys.
- Scalable – Great for side hustlers or full-blown apparel businesses.
Whether you want to sell t-shirts online or create a one-off piece for yourself, POD services make it incredibly easy.
How to Design a Custom T-Shirt with POD in 4 Easy Steps
Step 1. Choose the Right T-Shirt
Your shirt’s fabric, fit, and colour directly impact how your design will look and feel. Here’s how to make the right choice:
Material Matters:
- 100% Cotton: Ideal for direct-to-garment (DTG) printing. It absorbs ink well, making colours pop.
- Polyester or Poly Blends: Perfect for sublimation and direct-to-film (DTF) printing. Great for activewear or all-over prints.
- Stretch Fabrics: Look for blends with spandex or elastane for fitness gear. Ensure the print method used won’t crack with movement.
Colour Considerations:
- Light-Colored Shirts: Best for colourful, dark, or high-contrast images. DTG and DTF printing work well here.
- Dark Shirts: Suitable for light or bright designs. Be sure to use a printing method like DTF or screen printing that provides solid opacity.
Pro tip: Always aim for contrast between your image and shirt colour. If your design blends in, it’ll lose its visual impact.
Pick the Best Printing Method for Your Design
Not all shirt printing techniques are created equal. Your image, shirt material, and budget will help determine the best option.
Popular Shirt Printing Methods:
- Direct-to-Garment (DTG):
- Best for: Detailed, colourful designs
- Works on: 100% cotton
- Pros: High-resolution prints, good for small batches
- Direct-to-Film (DTF):
- Best for: Versatile fabric types, including blends and synthetics
- Works on: Light and dark garments
- Pros: Vibrant, durable, and works well on stretchy fabric
- Sublimation:
- Best for: All-over prints or photo-realistic designs
- Works on: Polyester and poly-blends only
- Pros: Seamless prints that never crack or peel
- Screen Printing:
- Best for: Bold, simple graphics (like logos or slogans)
- Works on: Most fabrics
- Pros: Cost-effective for bulk orders, long-lasting
Step 2: Create a High-Quality T-Shirt Design File
Before your artwork can shine on fabric, you need to start with a crisp, high-resolution design file. Most print-on-demand platforms, including Printify and Printful, support common file formats like PNG, JPEG, and SVG, but the quality of your file makes all the difference between a professional-looking tee and a pixelated disappointment.
Here are a few ways to create a standout design, no design degree required:
- Design from scratch using free or paid tools like Adobe Illustrator, GIMP, Pixlr, or Fotor. These programs let you control resolution, layers, and transparency so your design looks sharp on any colour shirt.
- Digitize your artwork by scanning a sketch or snapping a photo with your smartphone. Clean it up in a free editor, remove the background, and adjust the contrast so it prints clearly.
- Hire a freelance designer from platforms like Fiverr, Upwork, or 99designs. Share your concept and get a polished, print-ready file that’s ready to upload.
- Use pre-made designs from Printify’s built-in library. You can personalize them with your own text, icons, or image overlays to make them unique.
Pro Tip: For best results on both light and dark fabrics, use images with high contrast and remove any unwanted backgrounds. Always export at 300 DPI (dots per inch) and save as a transparent PNG if your design isn’t full-bleed.
Step 3: Apply Your Image to the Shirt Using an Online Mockup Tool
Now comes the fun part: placing your image on the shirt and previewing it in real time. With Printify’s easy-to-use Product Creator, you don’t need graphic design skills or complicated software to build a beautiful t-shirt mockup.
Once your image is ready, follow these steps:
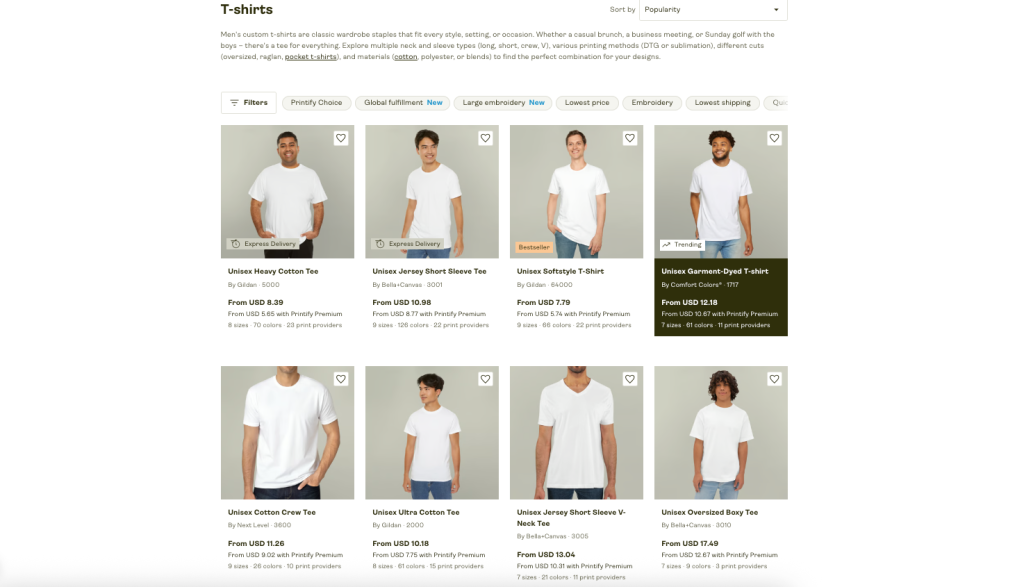
First, choose your blank t-shirt from Printify’s catalogue. You can easily filter by fabric type, fit, or print method to find the perfect base. Next, upload your design file and drag it into position on the shirt. Once that’s in place, you can customize further by adding text using a wide library of fonts and colors—there’s even emoji support for a playful touch. In addition, you can explore design extras such as free clipart, icons, and background patterns to layer over your image.
If you want to take it a step further, use the pattern tool to create a repeating background or full-coverage print. Or, for instant creativity, try the AI image generator to experiment with brand-new design ideas. Finally, preview your finished product in the 3D viewer to see how it looks on real fabric and models before publishing it.
This step lets you visualize your final t-shirt, tweak positioning, and make sure the design looks right on the selected shirt colour and fabric type, without installing a single piece of software.
Step 4: Order a Sample and See Your Design in Real Life
Before you launch your custom shirt online or give it as a gift, it’s smart to order a sample. This lets you test the print quality, feel the fabric, and see how the design holds up after a few washes.
Here’s how to place a personal order directly from your Printify dashboard:
- Head to My Products.
- Find your custom-designed shirt and click the shopping cart icon labeled Create Order.
- Enter your shipping address and payment info.
- Click Order, sit back, and get excited.
In just a few days, you’ll receive your very own printed t-shirt. Ready to wear, gift, photograph for your online store, or use as a test run before bulk ordering.
Why Samples Matter: Not all fabric and print combinations look the same in person as they do on-screen. A sample gives you peace of mind before committing to a product line or offering your designs to customers.
Step 5: Launch Your T-Shirt Business and Start Selling Online
Once you’ve created your custom t-shirt design and ordered a sample to check the quality, the next step is turning your creation into a product people can buy. Thanks to Printify, launching your own t-shirt business is easier than ever, with no printing, packaging, or inventory required.
Whether you want to build a side hustle or a full-time eCommerce brand, you can start selling t-shirts online in just a few clicks.
Printify integrates seamlessly with today’s most popular online marketplaces and eCommerce platforms. Once your account is set up, you can connect your Printify store to:
- Etsy – Ideal for handmade or unique designs. Perfect if you’re targeting a creative or gift-buying audience.
- Shopify – Best for building your own branded t-shirt store with full control over your website and customer experience.
- WooCommerce – Great for WordPress users who want to customize their online store with open-source flexibility.
- Amazon – Access millions of shoppers, but be prepared for competitive pricing and product optimization.
- eBay – A good option for unique or niche designs, especially with loyal communities and collectors.
- Wix, Squarespace, BigCommerce, and PrestaShop – Other great options depending on your budget, design preferences, and marketing tools.
No matter which platform you choose, Printify handles the fulfillment. Printing your shirts, packing the orders, and shipping them directly to your customers.

How to Get Your First T-Shirt Listing Live
Here’s a quick checklist to publish your product and get your store up and running:
- Upload product photos – Use mockups provided by Printify or take your photos using the sample shirt you ordered.
- Write product descriptions – Craft compelling copy that highlights the design, fit, fabric, and ideal use case. Make it keyword-rich to help people find your product in search.
- Set your pricing – Factor in production cost, shipping fees, and profit margin. Research competitors to stay competitive.
- Choose your shipping settings – Each platform has different rules and integrations, so make sure shipping is configured correctly.
- Click Publish – Once you hit the publish button, your product goes live for the world to see.
That’s it. Your online t-shirt store is open for business!
Which T-Shirt Printing Method Is Right for You?
Choosing the best t-shirt printing method depends on a few key factors: your design style, fabric type, order size, and business goals. Whether you’re designing one shirt for personal use or planning to scale a print-on-demand t-shirt brand, understanding the pros and cons of each technique will help you make the right choice.
Let’s break down the most popular t-shirt printing methods and when to use each one.
1. Direct-to-Garment (DTG) Printing
Direct-to-Garment (DTG) printing is best suited for full-colour, detailed designs on cotton fabrics. It works particularly well on 100% cotton or high-cotton blends, making it an excellent choice for one-off shirts, small batches, and intricate artwork.
DTG operates much like an inkjet printer, but instead of paper, the design is printed directly onto the t-shirt using water-based inks. This method results in vibrant, photo-quality prints that are soft and smooth to the touch, blending seamlessly with the fabric.
One of the major advantages of DTG is that it requires no setup fees or minimum order quantities. It’s ideal for complex, colourful designs and offers a light, natural feel on the fabric. However, DTG isn’t the best option for polyester or synthetic materials. It also has a higher per-unit cost when ordered in bulk and performs best on light-colored shirts.
Overall, DTG printing is perfect for experimenting with new designs or launching a print-on-demand clothing line without needing a large upfront investment.
2. Direct-to-Film (DTF) Printing
Direct-to-Film (DTF) printing is a highly versatile method that works well across various fabric types, including cotton, polyester, blends, and even dark-colored materials. It’s ideal for both small and large orders, especially when full-colour, detailed designs are involved.
The DTF process involves printing your design onto a special transfer film, which is then heat-pressed onto the fabric. Unlike DTG, DTF performs well on both light and dark garments and produces slightly raised, vibrant prints with sharp detail.
There are several advantages to DTF printing. It works on a wide range of fabrics, delivers bold colours and fine detail, and tends to be more durable than DTG when it comes to repeated washing. However, the prints may feel slightly thicker than DTG prints, and some designs might need background removal for the best finish.
Overall, DTF printing is a flexible, high-quality solution for creators who want professional-grade results without being limited by fabric colour or type.
3. Embroidery
Embroidery is best suited for minimalist designs, logos, and text. It works well on cotton, cotton blends, and thicker fabrics, making it ideal for premium branding, uniforms, and garments intended for long-term use.
Unlike printing methods, embroidery uses thread to stitch the design directly onto the fabric, giving it a tactile and textured finish. While it’s not designed for photo-realistic prints or gradients, it excels with clean, simple artwork like logos, initials, or minimal graphics that convey a sense of quality and professionalism.
Embroidery offers several advantages: it’s extremely durable, long-lasting, and adds texture and perceived value to your apparel. It’s especially effective for achieving an upscale, professional appearance. However, there are some limitations. Embroidery is typically restricted to simpler designs and smaller areas, and it comes with a higher cost, especially for intricate stitching. It’s also not suitable for lightweight or thin fabrics, as the stitching can cause distortion.
Use embroidery when you want your shirts to feel high-end and professional, perfect for employee uniforms, corporate gifts, or limited-edition merchandise.
4. All-Over Print (AOP) / Sublimation Printing
Sublimation, also known as all-over printing (AOP), is best for creating seamless, edge-to-edge patterns and photo-based designs. This method works on polyester or poly-blend shirts, performing best on white or light pastel-colored fabrics. It’s ideal for bold, full-coverage t-shirt designs, sportswear, or branded merchandise where visual impact is key.
The sublimation process involves using heat and pressure to embed dye directly into the fabric fibers. The result is a vibrant, ultra-durable print that won’t crack, peel, or fade over time. Because the ink becomes part of the fabric itself, the final product remains breathable and soft to the touch.
There are many advantages to sublimation printing. It allows for full-coverage, edge-to-edge prints and is perfect for colourful, abstract, or photographic designs. It’s also incredibly long-lasting and maintains colour vibrancy through repeated washes. However, sublimation has some limitations. It only works on polyester or light-colored synthetic blends, is not compatible with 100% cotton, and doesn’t perform well on dark-colored shirts.
If you’re looking to cover an entire shirt with a stunning design, such as a scenic landscape, bold pattern, or fully branded look, sublimation is your go-to printing method.
5. Screen Printing
Screen printing is best suited for bulk orders that feature bold graphics or designs with a limited number of colours. It works well on most fabric types, including both dark and light shirts, making it a popular choice for merchandise, events, and promotional t-shirts.
This traditional printing method involves creating a separate stencil, or “screen,” for each colour in your design. Ink is then pressed through the mesh screen onto the fabric in layers. Though it’s been used for decades, screen printing remains a go-to technique thanks to its reliability and high-quality results.
Screen printing offers several advantages. It produces rich, vibrant colours with a slightly textured feel and is extremely cost-effective when printing in large quantities. The resulting prints are durable and resistant to repeated washing, maintaining their look over time.
However, the method does come with some drawbacks. The initial setup cost is relatively high, which makes it less ideal for one-off or small-batch orders. It also works best with simple designs that use only a few colours, and it’s not suited for photo-realistic or gradient images.
If you’re planning a bulk order for a concert, brand launch, or team event, screen printing delivers professional, eye-catching results at an affordable price per unit.
Why Printify Is the Best Way to Print Pictures on Shirts (and Start Selling)
If you’re looking for a hassle-free way to print custom t-shirts without wrangling with irons, heat presses, or confusing software, Printify is hands-down one of the best platforms to get started. Whether you’re designing one shirt for fun or launching a full-blown t-shirt business, Printify makes it easy to turn your vision into reality with high-quality printing, an intuitive design tool, and seamless integrations for selling online.
Here’s why creators and entrepreneurs choose Printify to bring their shirt designs to life:
A T-Shirt Style for Every Occasion
From everyday basics to fashion-forward styles, Printify offers hundreds of t-shirt options in a wide range of cuts, fits, and fabrics. Whether you’re creating a laid-back look or something more eye-catching, there’s a style to suit every need.
You can start by choosing from classic crewnecks and V-necks, which offer a timeless appeal. Alternatively, for a more tailored and trendy vibe, women’s fitted tees and cropped shirts are excellent options. If versatility is what you’re after, tank tops, polo shirts, and long sleeves provide great layering possibilities. Meanwhile, for those who want to truly stand out, t-shirt dresses, raglans, and even Hawaiian shirts add a bold twist to any collection.
What’s more, each style comes in multiple colours and sizes, giving you the flexibility to match your design with the perfect canvas.
Multiple Print Methods to Match Your Design Goals
Printify supports several professional decoration methods to suit any type of artwork or printing need, ensuring your designs come to life just the way you envision them.
Direct-to-Garment (DTG) printing is perfect for detailed, colourful designs on cotton shirts, offering excellent accuracy and vibrancy. For even more versatility, Direct-to-Film (DTF) printing allows for bold, vibrant prints on both light and dark garments, including blended fabrics. If you’re aiming for full-coverage, edge-to-edge designs, sublimation printing is ideal, especially on polyester materials.
For a more textured and premium look, embroidery is a standout option. It’s perfect for logos, monograms, or minimalist designs that benefit from added dimension and durability.
Whether you’re going for bold graphics, photo-realistic images, or a high-end embroidered finish, Printify has a printing method to match your brand’s aesthetic and goals.
Built-In Design Tools (No Software Needed)
Printify’s user-friendly Product Creator allows you to customize your t-shirt designs directly from your browser, making the entire process quick and intuitive.
You can upload your images or artwork, add text, shapes, or clipart, and even use the pattern tool to create seamless backgrounds. If you need inspiration, the AI-powered design tools can help generate fresh, creative ideas tailored to your vision.
Once your design is ready, you can preview your t-shirt in 3D to see exactly how it will look before placing an order. No design experience? No problem. The drag-and-drop interface is simple and intuitive, making customization easy, even for first-time users.
Print One or Print a Hundred – No Minimums
Whether you’re ordering a single shirt for yourself or creating a full product line for your online store, Printify makes it easy with print-on-demand services that require no order minimums.
This means you don’t have to worry about storing inventory, covering upfront costs, or taking on any production risks. It’s a hassle-free way to bring your designs to life.
Printify is perfect for testing new ideas, launching fundraising campaigns, or creating custom shirts for events, teams, or special occasions, without the pressure of bulk orders.
Global Shipping, Made Simple
Printify works with a global network of print providers, which means worldwide delivery with fast turnaround times. You can sell and ship to customers around the world without handling a single package yourself.
Sell or Wear – Your Choice
Want to launch your own t-shirt brand? With Printify, it’s easier than ever. The platform seamlessly integrates with major eCommerce sites such as Etsy, Shopify, Amazon, WooCommerce, Wix, Squarespace, and more. Once you connect your online store, all you need to do is publish your t-shirt listings, and Printify will take care of everything else—from printing to doorstep delivery.
On the other hand, if you’d rather design shirts just for yourself or as personalized gifts, that’s perfectly fine too. Printify works just as well for personal use, giving you the freedom to create one-of-a-kind pieces without the hassle of managing inventory or handling logistics.
Final Thoughts: Turning Your T-Shirt Ideas into Reality
Printing a picture on a shirt has never been easier, whether you’re making a one-of-a-kind tee for yourself or launching a custom apparel business. With the right tools, a clear design, and a printing method that fits your needs, your creativity can go from screen to fabric in just a few clicks.
From DIY hacks using your home printer to professional-grade results with platforms like Printify, there’s a method for every skill level and budget. Whether you want to express your personality, test a business idea, or create memorable gifts, custom t-shirts are a fun and impactful way to do it.
Remember:
- Use high-resolution images for the best results.
- Choose the right fabric and print method based on your design.
- Preview and test before going all-in on bulk orders.
- And most importantly, have fun with it!
Whether you’re printing for passion, profit, or both, your next great design is just a shirt away.